Posted on Leave a comment

Belcarra by Sewaholic

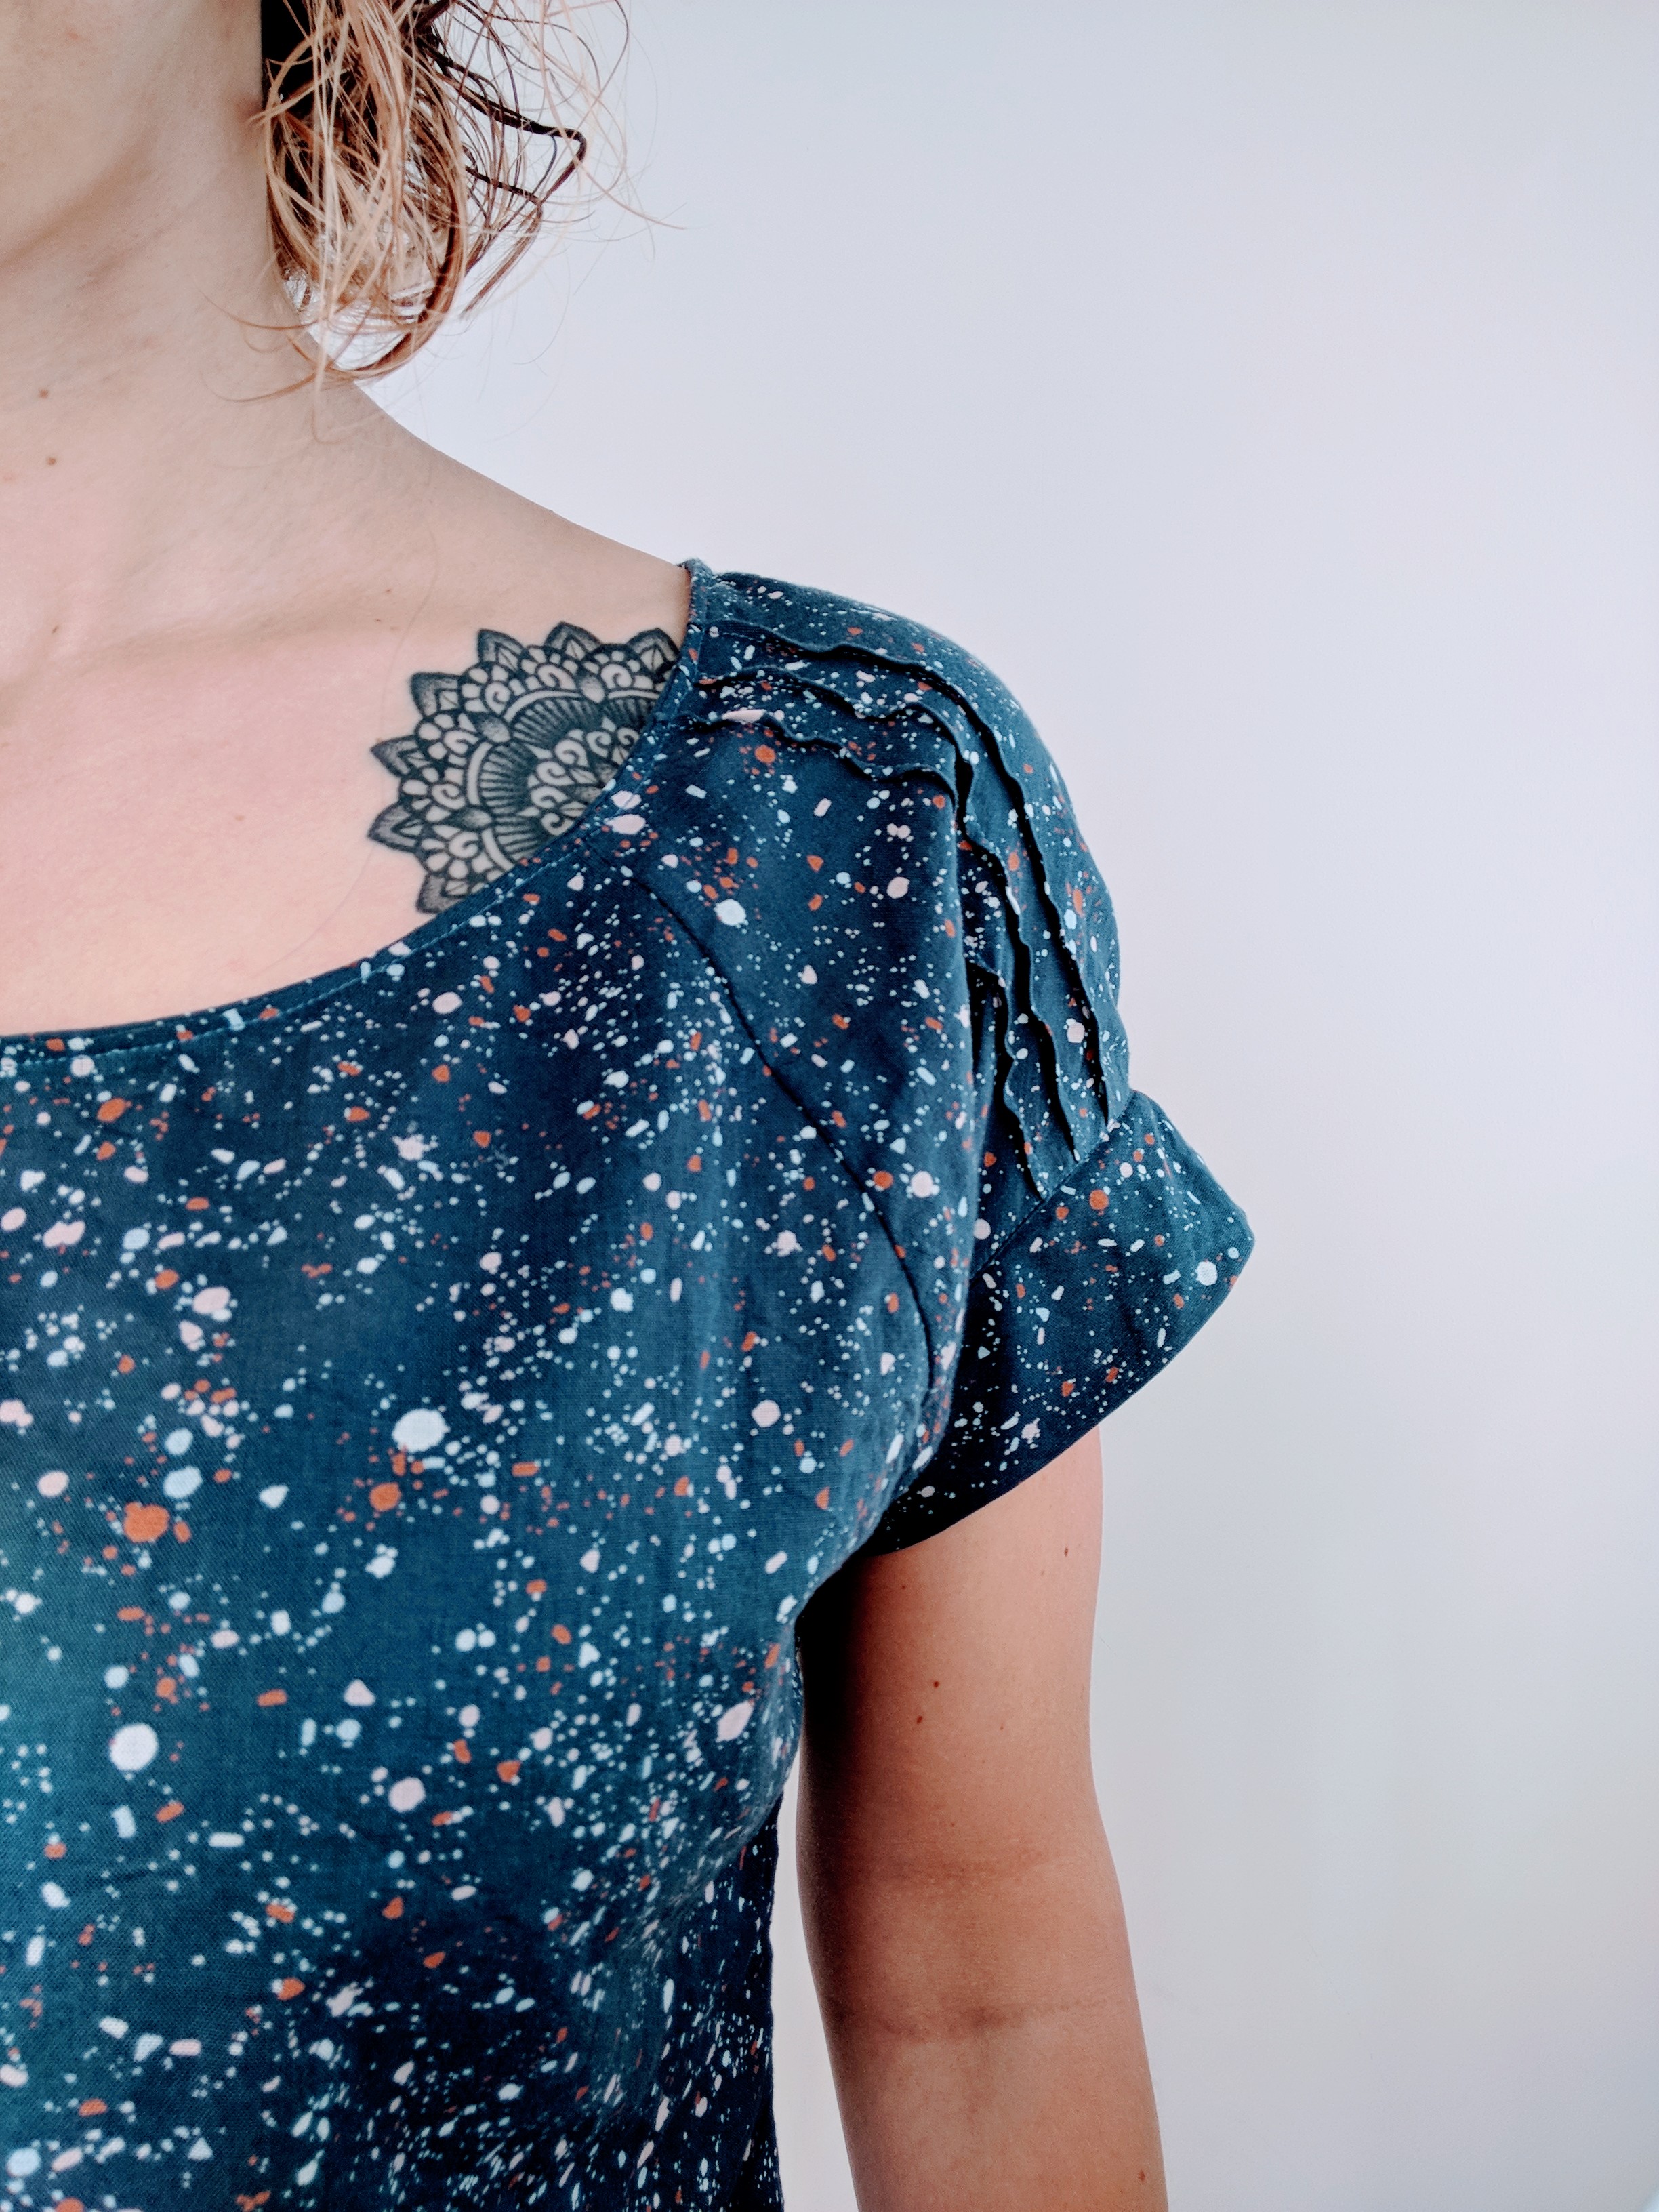
Front detail

Pattern: Belcarra by Sewaholic
Fabric: Cotton Gauze “Terrazzo Night by Atelier Brunette” from Guthrie & Ghani
Little Bits: 100m Gutermann sew all thread

Size: 8/8/2 (Graded from size 8 down to 2 between waist and hips)
Version: View B
Mods: None!

The Pattern

It’s a light and airy easy to wear top. The length of the top is spot on however the neckline is a bit wide for me. I prefer a neckline slightly more scooped downwards rather than wide across the shoulder. I think I would make a variation of this top again, however, I would make that alteration to the neckline. Just bringing the neckline in a tad.

The Fabric

This was lovely fabric to work with. Not slippery at all, or thick, just a nice light but still stable material to work with. I would definitely like to use cotton gauze again. I am also interested to see how another cotton gauze compares to this one. It wasn’t a cheap fabric and while I love the print on the shirt I think the fabric was deserving of a more intricate or beautiful pattern rather than the more basic tee-shirt shape I chose to make.

Posted on Leave a comment

Stella Hoodie by Tilly and the Buttons

Pattern: Stella Hoodie by Tilly and the Buttons
Fabric: Marble Effect Teal Loopback Cotton Jersey Fabric (1.8m) + Teal Loopback Cotton Jersey Fabric (0.6m) from Guthrie & Ghani
Little Bits: 100m Gutermann sew all thread

Size: 8
Version: N/A
Mods: Lengthed 5cm + FBA of 6.4cm (1.6cm per side)

I have so much love for this project. Both the pattern and the material are absolutely wonderful. I bought the ‘Stretch’ book from Tilly and the Buttons because comfy cozy snuggly clothes? Yes please! Before you carry on reading I should point out I’ve not received any sort of payment or commission for this post. I’m gushing on for ages about it purely based on my enjoyment of sewing this!

The pattern

Firstly, it is such a well-written pattern. The instructions are incredibly clear and the pictures are beautiful! Each step is laid out in easy to understand terms and anything that could be a bit tricky is explained in even greater detail. It’s so nice to just be able to confidently follow the next step, not wondering if you’re about to ruin your project. It’s also printed on lovely thick paper so you don’t have to worry about it disintegrating into shreds of tissue paper after opening it a few times!

Everything comes together perfectly and the fit is spot on. I don’t think there was even a single point of frustration while making this top. This is easily my favourite hoody now!

The fabric

I used a gorgeous marble effect jersey for the main body of the sweater and this really lovely matching teal jersey for the sleeves and hood lining. For the hoody ties, I used a strip of the accent colour.

Will there be another?

There might already be one in the works.. so yes! I intend to have a pile of these made in all sorts of soft and fluffy fabrics. If you haven’t made one yet I highly recommend it. Although I’m sure you have realised that by now!

Posted on 1 Comment

Pirate Kalle

Pattern: Kalle by Closet Case
Fabric: Lost At Sea Navy Blue Viscose Fabric from Guthrie & Ghani (1.2m)
Little Bits: 100m Gutermann sew all thread, interfacing, buttons

Size: 8
Version: View A
Mods: Lengthed front & back of view A by 10cm

I absolutely LOVE my first Kalle and before I’d barely even worn it I was already making plans for this one.

When I saw this fabric on Guthrie & Ghani I immediately knew it needed to be a Kalle. A lovely, billowy Kalle with pirate ships on it! Ok, so maybe they are just supposed to be normal ships but I always think pirate ships when I see them…

Pirate Kalle - Fabric
Pirate Kalle – Fabric

Like a good sewer, I prewashed my fabric and interfacing. The latter I slightly regretted because I remembered to do it AFTER I’d cut out all the dried fabric pieces and had to wait until the interfacing had dried to iron it on for step 1! I suppose it’s better, in the long run, to make sure the interfacing won’t shrink. It’s so frustrating when you just want to jump on the sewing machine!

Initially, I lay my pieces out as suggested by the pattern. I then sit and rearrange them until I’ve made the absolute best use of fabric I can think of. It’s a nice little sense of achievement to end up with a single larger piece leftover rather than scraps. I did start to wonder, what am I going to do with all these leftovers that are piling up… So I thought, hey, I’ll be clever and order less this time. Turns out 1.2m for a lengthened view A (which calls for 1.8m before my extension) is a wee bit of a stretch.

Pirate Kalle - Pieces cut out
Pirate Kalle – Pieces cut out

Somehow I managed to make it work with the scariest, smallest amount of leftovers I’ve ever had. I needed to ditch the full collar I’d originally planned and swapped in the band collar but I still managed my full hidden button placket! My hidden button placket was the last piece to cut out and I was fully mentally prepared to somehow cut it using two pieces of fabric and sew them together but my last piece ended up being EXACTLY the length it needed. No joke, I didn’t need to trim any off the top or bottom, it was the perfect length.

Would I try this again with 1.2m, probably not no… maybe 1.3m or 1.4m 🙂 That’s another thing I love about buying from Guthrie & Ghani, they sell in 10cm increments so you aren’t forced to buy a full metre when you don’t need it.

Posted on 1 Comment

Kalle by Closet Case : My first Kalle

Pattern: Kalle by Closet Case
Fabric: Crepe // “Bouquet Des Fleurs” from Guthrie & Ghani (1.8m)
Little Bits: 100m Gutermann sew all thread, interfacing, buttons (etsy, from ages ago and can’t remember shop name sorry!)

Size: 8
Version: View A but with shirt collar
Mods: Lengthed front & back of view A by 10cm


This top is incredible. Kalle is very rewarding to sew and the end result is a beautifully drapey easy to wear shirt. This was a lot of firsts in sewing techniques for me. My first collar, first yoke style shirt, and first button band. Of course, because apparently, I don’t like to go easy on myself, I also did my first hidden button placket. The pattern was very easy to understand and I somehow got through all of it with results that even I couldn’t nitpick! I knew as soon as I was done I was going to make another.

Kalle by Closet Case: Close up of button placket
I have to say the scariest bit was probably the burrito rolling method of attaching the yoke. It’s clever, and I had already done a similar thing when sewing facing to the neckline of a shirt, but it feels so unnatural. Like I’m about to sew all my hard work into an enclosed roll of despair.

Kalle by Closet Case: Close up of hem

The only bit of the pattern I remember having an issue with was the sleeves. It doesn’t say in the printed pattern that you unfold the freshly pressed sleeve & only sew one layer to the shirt, then fold over the other half to the inside, where it then ends up hiding the seams. I won’t go into more detail here because the guides Heather from Closet Case pattern has written are excellent and well worth a read.

Here is a link to the sew along/guides for Kalle by Closet Case: https://closetcasepatterns.com/kalle-shirtdress-pattern-sewalong/
I highly recommend pouring yourself a coffee and reading through all of them before you start. They are well written with lots of helpful imagery.

So there we are! My first Kalle by Closet Case done and I’ve already started another.

Posted on Leave a comment

How to get the best fit: Knitting a swatch

You’ve found a sweater you want to knit. The perfect yarn. And you’ve chosen the right size to knit. But you really should knit a swatch first.

I have to admit when I am about to start a sweater the thought of holding off while I knit a swatch is not at all appealing. However, knowing that if I don’t I might be ripping back hours (if not days!) worth of work later on does encourage me to do it. It’s not as fun as getting started on the sweater, but if you weigh that against how frustrating it will be to have spent weeks or months of time on something that doesn’t fit…

There are a few key bits of information to help you knit a useful swatch:

Make a big enough swatch

You’ve convinced yourself to do a swatch so do yourself a favour and make it big enough to be useful. There are two main ways I’d suggest getting a useful sized swatch.

1. Make it using the exact same stitch and row count as the 4″ pattern gauge is.

When blocked this will give you a very good indication as to whether your gauge is right on target (is it 4″ x 4″?) or if you’re a bit tight or loose. Do not add garter or other stitches around the edge in an attempt to prevent rolling because these stitches can distort the stitches next to them giving you a false reading. Instead, use pins but make sure you don’t stretch the fabric out, just enough that it won’t keep rolling in on itself (mostly a factor if it is a stockinette swatch).

2. Make a big massive momma of a swatch.

This is the way I try to do it when time and my patience allows. Using enough stitches & rows to make a swatch at least 6.5″ x 6.5″ will give you plenty of information. It will let you take measurements from several different spots along the swatch to see if your gauge is consistent.

I will typically take a stitch count measurement in 3 spots along the swatch. All on different rows, and different left to right sections. If the stitch count is the same in all 3 I move onto measuring row gauge, otherwise I’ll continue to measure a few more spots and see what my average is. Using one rouge stitch count could really offset your whole sweater. You might also find your tension is tighter or looser near the edge and if you only have a small swatch this will affect the gauge you use for your main garment.

Try a couple different needle sizes

The point of a swatch is to make sure your yarn and needle size get gauge. If it doesn’t you’ll have to try another needle size. If you know you are generally a tight or loose knitter you might want to try a second swatch at the same time in a larger or smaller needle size and then throw it in the sink to block with the other one. I find this also will prevent the “oh, it’s a bit small but I can’t be bothered to knit another swatch” Or “the next needle size up will be fine…” scenario. It happens. And it hasn’t usually worked out for me 😛

Label your swatches

There are a few tips I’ve read about how to keep your swatches labelled so you can tell which one used which needle. If I’m only knitting 2 swatches I mark one of them with a removable stitch marker at the corner. Remember to note somewhere which one has the stitch marker, you would be surprised at how easy it is to forget what seemed obvious the previous day. Another method is working a purl bump or ‘yarn over’ near the corner. This gives you a tally to show the needle size (4 yo’s = size 4 needle). Although, you would only want to do these techniques if you’re going with the massive momma swatch so you don’t change the dimensions of your measurable swatch area.

Treat it like you will the finished sweater

Your swatch is like a little version of your sweater. If you don’t wash and dry it the same way you will your sweater it won’t be very useful in showing you how much your sweater will change. There will be different factors in why your sweater might still grow more than expected. For example, the full weight of the sweater pulling it downwards overtime. The best thing you can do is to wash your swatch as you’ll be treating your main garment. If you’ll be a daredevil stress-free knitter who will be putting it in the washing machine then throw your swatch in with a load of laundry. It needs to go through the same experience as your sweater will. This goes the same for drying. Whether it will be a drying rack or the dryer, put your swatch through the same paces your sweater will be.

And finally, use the same needles as you will be using on the sweater (nickel plated/wood/acrylic

The smoothness/friction differences in these materials really can make a difference in your final tension.

Checking your gauge before starting a sweater is definitely a worthwhile investment of time. If you are going to invest your time in knitting a sweater you will want it to fit!

Hopefully these tips get you on your way to making a useful, worthwhile swatch!